I remember the first time I tried to mint an NFT.
I stared at my screen for 20 minutes trying to figure out what a gas fee was and why my wallet wouldn’t connect. It felt like everyone else knew some secret I didn’t.
You’re probably in the same spot right now. You want to create and sell your digital art or collectible but the whole process looks complicated.
How to mint an NFT ETRSNFT doesn’t have to be confusing.
I’ve minted dozens of NFTs on this platform. I know exactly where people get stuck and what actually matters versus what’s just noise.
This guide walks you through every single step. From setting up your wallet to listing your first piece for sale. No technical jargon unless I explain it first.
We tested this process multiple times to catch the common problems before you run into them. The steps work whether you’re creating art, music, or any other digital asset.
By the time you finish reading, you’ll have your NFT live on the ETRS marketplace. Not someday. Today.
Before You Begin: Essential Prerequisites for Minting
You can’t just show up and start minting NFTs.
I wish it worked that way. But before you can create anything on ETRS, you need a few things set up first.
Think of it like trying to buy something online without a credit card. You need the right tools in place or you’re not getting anywhere.
Setting Up Your Digital Wallet
First thing you need is a non-custodial wallet. That’s just a fancy way of saying a wallet where you control the keys (not some company holding them for you).
MetaMask is what most people use. It’s a browser extension that takes maybe five minutes to install. Coinbase Wallet works too if you’re already in that ecosystem.
The setup is pretty simple. Download the extension, create a new wallet, and write down your seed phrase. That seed phrase is everything. Lose it and you lose access to your funds. No customer service can help you.
Store it somewhere safe. Not on your computer.
Supported Blockchains on ETRS
ETRS works with Ethereum and Polygon right now.
Here’s the difference that matters. Ethereum is the OG blockchain for NFTs but gas fees can hit $50 or more when the network gets busy. Polygon runs as a Layer 2 solution on top of Ethereum with fees that usually stay under a dollar.
If you’re minting your first NFT or testing things out, Polygon makes more sense. You’ll save money on every transaction.
When you’re ready to learn how to mint an nft Etrsnft, you’ll pick which chain works for your budget.
Funding Your Wallet
Now you need crypto in that wallet to pay for minting and gas fees.
Buy ETH or MATIC from any major exchange like Coinbase or Kraken. Then withdraw it to your wallet address. Copy that address carefully because sending crypto to the wrong place means it’s gone forever.
For Polygon, you’ll need MATIC. For Ethereum, you’ll need ETH.
Start small if this is new to you. You don’t need much to mint on Polygon.
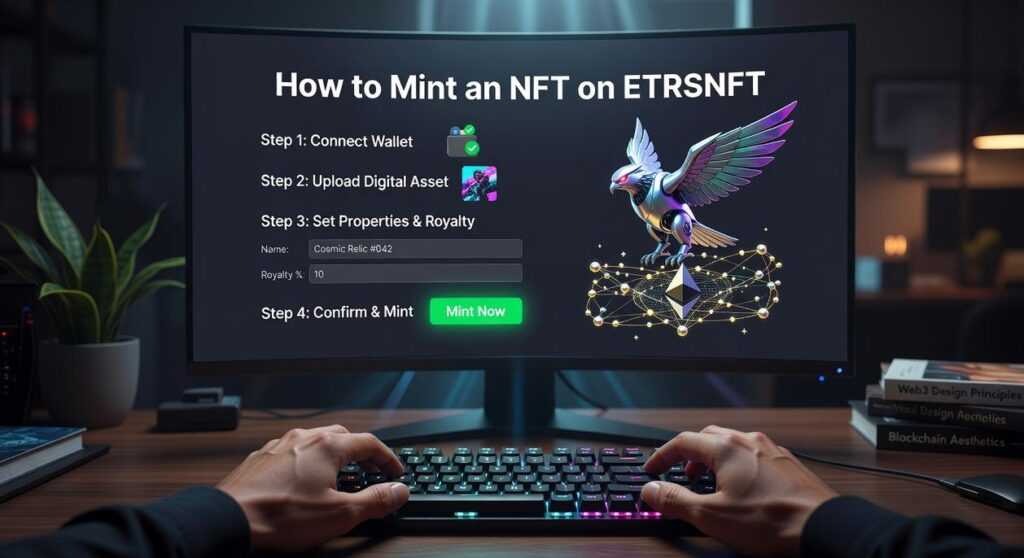
Step 1: Connecting Your Wallet to the ETRS NFT Platform
First things first. You need to connect your wallet.
Head over to the official etrsnft platform You’ll see a clean interface that doesn’t throw a million options at you right away.
Look for the ‘Connect Wallet’ button. It’s sitting in the top right corner where pretty much every Web3 platform puts it (because why reinvent the wheel).
Click it.
Your wallet extension will pop up. MetaMask, Trust Wallet, whatever you’re using. It’ll ask you to authorize the connection.
Here’s what some people get wrong. They see “sign this message” and panic. They think they’re approving a transaction or giving away access to their funds.
You’re not.
Signing a message just proves you own the wallet address. It’s like showing your ID at a bar. No money moves. No permissions granted beyond basic connection. In the evolving landscape of digital ownership, signing a message with your wallet address—much like showing your ID at a bar—ensures your authenticity in the world of Etrsnft without any transfer of funds or extra permissions.
This is standard dApp interaction. Every platform from OpenSea to Uniswap works the same way.
Click ‘Sign’ or ‘Confirm’ in your wallet.
Once you’re connected, the interface changes. You should see your wallet address displayed where that Connect Wallet button used to be. Usually it shows a shortened version like “0x1a2b…3c4d” instead of the full string.
That’s it. You’re in.
Now you can browse collections and learn how to mint an nft etrsnft without jumping through hoops every time you want to interact with the platform.
Step 2: The Creation Hub – Uploading and Defining Your NFT

You’ve got your wallet connected.
Now comes the fun part. Actually creating your NFT.
Think of this step like filling out a birth certificate for your digital asset. You’re not just uploading a file. You’re giving it an identity that’ll live on the blockchain forever.
Let me walk you through how to mint an nft etrsnft the right way.
Getting Your File Ready
ETRS supports the usual suspects. JPG and PNG for static images. GIF if you want some movement. MP4 for video content.
Most platforms cap file sizes around 100MB (though this varies). If your file is huge, you’ll need to compress it before uploading. Nobody wants to wait five minutes for an NFT to load.
The upload interface is pretty straightforward. Click the upload button. Select your file. Wait for it to process.
But here’s where most people mess up.
Your NFT’s Identity
The metadata is everything. It’s like the difference between a painting in a gallery with a proper placard versus one leaning against a wall with no context.
Your NFT’s name matters more than you think. Keep it descriptive but memorable. “Artwork #4738” tells me nothing. “Sunset Over Red Lion” or “Cyber Samurai Genesis” gives me something to remember.
The description is your sales pitch. Not in a pushy way. Just tell people what they’re looking at and why it exists. Two or three sentences usually does it. Maybe mention your inspiration or what makes this piece special.
Properties and traits are where things get interesting. These are the attributes that make your NFT searchable and comparable. If you’re creating a character, you might add “Background: Purple” or “Hat: Baseball Cap.” Collectors use these to filter and find specific combinations.
(This is especially important for collection drops where rarity matters.)
Standalone or Collection?
You’ve got two paths here. This ties directly into what we cover in Nft Whitelist Etrsnft.
A standalone NFT lives by itself. It’s a one-off piece that doesn’t belong to any series. Think of it like a single painting versus a series of prints.
Collections group related NFTs together. If you’re planning multiple drops with a similar theme or style, create a collection first. Then add each new NFT to that collection as you mint it.
Collections make it easier for buyers to find all your work in one place. They also help establish your brand on the platform.
Check out the nft guide etrsnft for more details on collection setup.
Once you’ve filled everything out, double check it. You can’t change most of this stuff after minting.
Step 3: Minting – Finalizing Your NFT on the Blockchain
You’ve uploaded your art. You’ve filled in all the details.
Now comes the part that makes it real.
Minting.
Look for the ‘Create’ or ‘Mint NFT’ button on your screen. It’s usually pretty obvious once your metadata is complete. Click it. As you embark on the exciting journey of minting your first NFT, it’s crucial to also consider how to keep your network safe Nft Etrsnft, ensuring that your digital assets remain secure as you navigate the vibrant world of blockchain technology.How to Keep Your Network Safe Nft Etrsnft
Here’s where things get interesting.
A pop-up will appear asking you to pay something called a gas fee. Ever wonder why you have to pay extra just to put your NFT on the blockchain?
Think of it this way. The blockchain is like a massive shared ledger that thousands of computers maintain. Those computers need compensation for processing and recording your transaction. That’s the gas fee.
It’s NOT a fee that goes to ETRS or any platform. It goes to the network validators who do the actual work of securing your NFT on the blockchain.
The amount? It varies. Sometimes it’s a few dollars. Sometimes more. Depends on how busy the network is at that moment.
Your wallet will show you the estimated cost before you confirm anything. Take a look at it. If it seems too high, you can wait and try again later when network traffic dies down.
Ready to proceed?
Hit confirm in your wallet.
Now here’s what most people don’t realize about how to mint an nft etrsnft. The transaction doesn’t happen instantly. The blockchain needs time to process and verify everything.
Could take 30 seconds. Could take a few minutes.
Don’t panic if nothing happens right away. Your wallet should show a pending transaction. You can usually click on it to see the status on the blockchain explorer.
Once it’s confirmed? You’re officially an NFT creator. This connects directly to what I discuss in Etrsnft Nft Guide by Etherions.
Pretty cool, right?
Step 4: After Minting – Listing Your NFT for Sale
You just minted your first NFT.
Now what?
I see this all the time. People finish the minting process and then stare at their screen wondering where their NFT actually went. It’s sitting in your wallet, but finding it isn’t always obvious.
Here’s how to locate it on ETRS.
Head to your profile page. You’ll see a tab labeled “Collected” or “My Items.” Click it. Your newly minted NFT should appear there within a few seconds (sometimes it takes up to a minute for the blockchain to update).
Once you spot it, click on the NFT thumbnail.
You’ll see a button that says “Sell” or “List for Sale.” That’s your next move.
Now comes the part where you decide what your NFT is worth. ETRS gives you two main options here. You can set a fixed price or start an auction. Fixed prices work better when you know exactly what you want. Auctions can drive up the price if there’s real demand.
According to NonFungible.com data from 2023, fixed-price listings account for about 73% of NFT sales on major platforms. Auctions sound exciting but they’re riskier if nobody bids.
Here’s something most guides skip.
Before your NFT goes live on the marketplace, you need to approve the collection for trading. This is a one-time thing per collection. ETRS will prompt you to sign a transaction that costs a small gas fee (usually between $5 and $15 depending on network traffic).
Think of it like getting a vendor permit before you can sell at a market.
Once you approve it, you won’t need to do it again for that collection. Future listings from the same collection? No approval fee.
After you confirm the approval transaction in your wallet, set your price and hit “Complete Listing.”
Your NFT is now live and ready for buyers.
If you want to protect your investment while listing, check out how to keep your network safe nft etrsnft. Security matters just as much after you how to mint an nft etrsnft as it does before. To ensure your assets remain secure throughout the process, following the Nft Guide Etrsnft can provide invaluable insights into safeguarding your investment after you mint your NFTs.
You’re Officially an NFT Creator on ETRS
You just walked through the entire process.
Setting up your wallet. Connecting to ETRS. Uploading your work. Listing it for sale. That’s all it takes to get your digital creation on the blockchain.
Creating an NFT doesn’t have to be a technical nightmare. I’ve seen too many people give up because the process seemed overwhelming.
But you followed these steps and now you know the truth. Anyone can do this.
The platform handles the complicated parts. You just focus on what matters: your art, your vision, your collection.
So here’s my question for you: what will you create first?
You have the knowledge. You have the tools. The how to mint an nft etrsnft process is no longer a mystery.
Head back to the ETRS creation hub right now. Start building your collection today.
Your first NFT is waiting to be minted.
 Tavien Zelthorne writes the kind of blockchain technology discussions content that people actually send to each other. Not because it's flashy or controversial, but because it's the sort of thing where you read it and immediately think of three people who need to see it. Tavien has a talent for identifying the questions that a lot of people have but haven't quite figured out how to articulate yet — and then answering them properly.
They covers a lot of ground: Blockchain Technology Discussions, Investment Strategies for Cryptocurrencies, Crypto News and Updates, and plenty of adjacent territory that doesn't always get treated with the same seriousness. The consistency across all of it is a certain kind of respect for the reader. Tavien doesn't assume people are stupid, and they doesn't assume they know everything either. They writes for someone who is genuinely trying to figure something out — because that's usually who's actually reading. That assumption shapes everything from how they structures an explanation to how much background they includes before getting to the point.
Beyond the practical stuff, there's something in Tavien's writing that reflects a real investment in the subject — not performed enthusiasm, but the kind of sustained interest that produces insight over time. They has been paying attention to blockchain technology discussions long enough that they notices things a more casual observer would miss. That depth shows up in the work in ways that are hard to fake.
Tavien Zelthorne writes the kind of blockchain technology discussions content that people actually send to each other. Not because it's flashy or controversial, but because it's the sort of thing where you read it and immediately think of three people who need to see it. Tavien has a talent for identifying the questions that a lot of people have but haven't quite figured out how to articulate yet — and then answering them properly.
They covers a lot of ground: Blockchain Technology Discussions, Investment Strategies for Cryptocurrencies, Crypto News and Updates, and plenty of adjacent territory that doesn't always get treated with the same seriousness. The consistency across all of it is a certain kind of respect for the reader. Tavien doesn't assume people are stupid, and they doesn't assume they know everything either. They writes for someone who is genuinely trying to figure something out — because that's usually who's actually reading. That assumption shapes everything from how they structures an explanation to how much background they includes before getting to the point.
Beyond the practical stuff, there's something in Tavien's writing that reflects a real investment in the subject — not performed enthusiasm, but the kind of sustained interest that produces insight over time. They has been paying attention to blockchain technology discussions long enough that they notices things a more casual observer would miss. That depth shows up in the work in ways that are hard to fake.